

This workstation design is wall-mounted and is not a free-standing desk. There are other "how to" articles on the internet that can show you inexpensive ways to build a standing workstation that is free-standing and not wall mounted. Here is a good post from IKEA Hackers that show a few free-standing designs: Corner & Extra Tall Standing Desks. I chose a wall mounted design because I knew I could do it inexpensively and my office space had wall space that made it ideal.
Let's get to it!
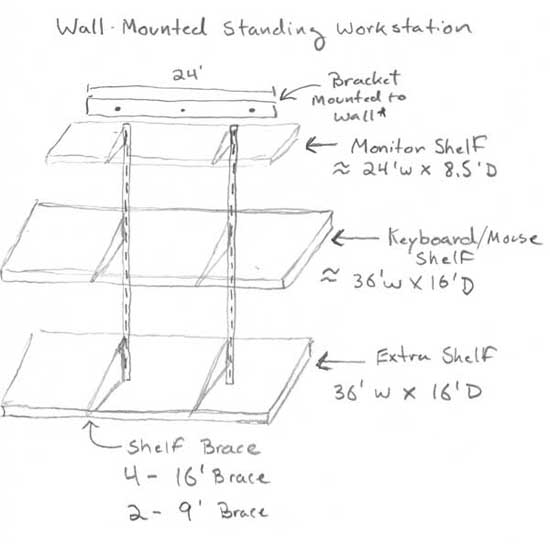
The workstation I built consists of a few basic do-it-yourself closet shelving parts and also some bulk melamine shelving boards. Let's take a trip to The Home Depot and show you what parts you are going to need and where to find them. Here is my original sketch of the workstation design (be kind, I am no architect).
The hardware can be found in the closet organization section of your local Home Depot. I will use the measurements and price estimates based on my initial design. You may choose to modify your design to meet your physical needs, but this should be a good starting point. Here are the items we are looking for:
- 1 - 24' Wall Bracket = $8.22
- 2 - 48' Shelf Track = $18.80 ($9.40 each)
- 4 - 16' Shelf Support Brackets = $27.76 ($6.98 each)
- 2 - 9' Shelf Support Brackets = $6.00 ($3.00 each)

 Next we need to go find the materials to make the desk surfaces or shelves. The Home Depot does have some pre-made shelves that are white or different colored wood grain. But, I found that the pre-made or pre-packaged shelves were not big enough to be used as the surface of my desk. I did however find a simple 9' x 24' white shelf for about $5 that worked to support the monitor.
The panels come in a number of different sizes and lengths. So your price may vary based on the size you want. I purchased a 6ft (L) x 16in (W) panel for around $16 and I had them cut the panel in half at the store. That gave me 2 - 3ft sections that I used in my design.

The melamine panels is the last thing we needed so here is what the final list looks like:
- 1 - 24' Wall Bracket = $8.22
- 2 - 48' Shelf Track = $18.80 ($9.40 each)
- 4 - 16' Shelf Support Brackets = $27.76 ($6.98 each)
- 2 - 9' Shelf Support Brackets = $6.00 ($3.00 each)
- 1 - 9' x 24' white shelf for the monitor = $5
- 1 - 6ft (L) x 16in (W) melamine panel = $16
- Total = $81.78 + Tax
Not too bad. Don't forget, if you are a veteran you can get and extra 10% off when you check out at the Home Depot by showing some sort of proof of veteran status.
Installation
Now that you have all the raw materials it is time to install the standing workstation. By now, you have place in mind to build your workstation and have measured to make sure the panels you have will fit where you want everything to go. One of the great things about this design is that all of the shelves are adjustable. So you don't have to worry too much right now about the ergonomics or exact placement of the work surfaces yet. You just need to make sure you install the shelf track in such a manor that will give you enough range up and down to meet your needs.
The first and really only thing you are going to need tools for is the wall bracket or cross bar. I have mine installed about 5 feet from the floor. There should be some instructions on the back of the crossbar to guide you through this. The most important point about installing the wall bracket is to make sure you install and attach it on to the studs inside the wall. If you don't know what I mean, you may want to get a little help. You can use a stud finder (available at The Home Depot if you don't have one) that you can use to find the stud in the wall. That is where you want to attached the cross bar to make sure you have enough support to handle the weight of the workstation.

The second most important thing you need to know is to make sure your wall bracket is level. It may seem obvious, but it is something you will want to get right the first time. After you have the wall bracket install the rest is cake. Install the shelf and adjust the width as needed. The wider you space the tracks the better stability you should get from the desk surface. Mine are about 20 inches apart.
Now you are ready to think about surface placement. This is where ergonomics come into play. You are going to want your monitor at a comfortable eye-level when standing. So, your first monitor shelf should be placed on the track where the monitor will sit comfortably at eye-level. You may want to install the first shelf and put the monitor on top just to test. Once you are happy with that, move on to the next shelf.

The next shelf is where your keyboard and mouse will be. This placement is also very important. You are going to want it positioned in a way that when you are typing your arms are at a 90 degree angle. Meaning, you don't want the shelf too high or too low. Your wrists should be straight and not bent too much when standing and typing. You may have your own preferences and since the self is adjustable you should have no problem finding the right spot.
The last shelf I put at a comfortable distance below the keyboard surface to keep a few other things like the network hub, desktop scanner and external hard drive. It's really just for just extra space so the spacing or placement is not a crucial as the 2 above.
When you are all done, you standing wall-mounted workstation may look a little something like mine.
I hope you find this post helpful. Please feel free to leave a comment below if you have any questions. If anyone comes up with a great idea for cable management, I would love to hear about it. This design does leave some things a bit exposed and I am sure there are better ways to clean things up a bit. That being said, I am happy with mind and it functions very well for my needs.